Set up Plaso
Get your Plaso WSL distro ready.
Follow the Linux export and Windows import in sequence. The screenshots stay beside the steps they illustrate; finish by checking all three Plaso commands.
- On Linux
- Export the container
- On Windows
- Import into WSL
- Ready when
- The tools respond
Prepare the Plaso WSL distribution on your Windows analyst VM, then continue to Create a Super Timeline. The Docker export runs on the Linux VM; the WSL import runs on Windows. The screenshots follow those two environments in that order.
Before you begin
Need: an authorised disposable Windows analyst VM with WSL available, a Linux VM with Docker for the export steps (or an already prepared Plaso tar archive), and enough storage for the archive, distro and case outputs. If Plaso is already installed, go to Verify the Plaso WSL distro before starting the timeline demonstration.
The screenshots show version 20260119; the latest image can produce a different version, digest or parser set. Record the versions after import and use the installed --help if an option differs.
Accessing Plaso in SUSA
Plaso (log2timeline) is a tool used to collect, parse, and correlate timestamps from multiple artefacts into a single timeline.
Importing a Plaso WSL distro from a Docker Image
Run the following commands in SANS SIFT VM or Linux VM of your choice. The commands are based on Microsoft’s documentation.
Use docker to pull the latest version of Plaso:
root@siftworkstation:/cases# docker pull log2timeline/plaso:latest
latest: Pulling from log2timeline/plaso
a3629ac5b9f4: Pull complete
6a3a6e4df7ce: Pull complete
a1418a9ea6a2: Pull complete
4f4fb700ef54: Pull complete
1eeb3b3a10d8: Pull complete
Digest: sha256:e4813c242d649dda83add1f939bb0c5dad7eb1ad6bcc2db9d4e14f3f0ae1a140
Status: Downloaded newer image for log2timeline/plaso:latest
docker.io/log2timeline/plaso:latest
Verify that the image has been pulled successfully:
root@siftworkstation:/cases# docker image ls
REPOSITORY           TAG        IMAGE ID       CREATED       SIZE
log2timeline/plaso   latest     9b64af4581bc   8 weeks ago   480MB
<SNIP>
Create and start a Docker container from the log2timeline/plaso:latest image and run the log2timeline.py --version command within it. This names the Docker container Plaso-latest.
root@siftworkstation:/cases# docker run -t --name Plaso-latest log2timeline/plaso:latest log2timeline.py --version
plaso - log2timeline version 20260119
Export all of the files in the new log2timeline/plaso:latest container into a tar archive file named Plaso-latest.tar located in the /cases directory.
Delete the temporary container we created for export purposes.
Copy the Plaso-latest.tar from the Linux VM to the Windows VM (C:\Tools\Plaso-latest). Refer to Using the SMB share on the Linux VM section if required.
In the Windows VM from an Administrator command terminal, make a folder called Plaso-latest to provide a directory location where the custom WSL distro will store its files.
Next, navigate to the C:\Tools\Plaso-latest directory, import the tar file into WSL using the following commands:
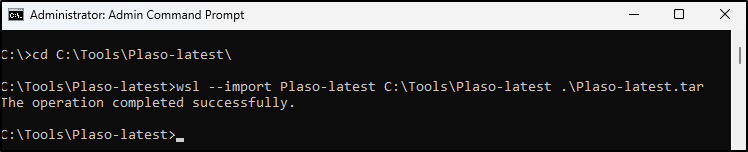
Figure 1. Import the exported container into WSL on the Windows analyst VM.
The custom WSL distro for Plaso should be ready. Run the command wsl -l -v to check which distribution you have installed. Use the command wsl -d Plaso-latest to run the new distro directly, or select from the Windows terminal new tab dropdown list.
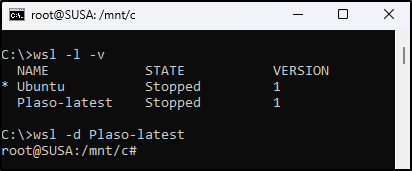
Figure 2. List the installed WSL distributions.
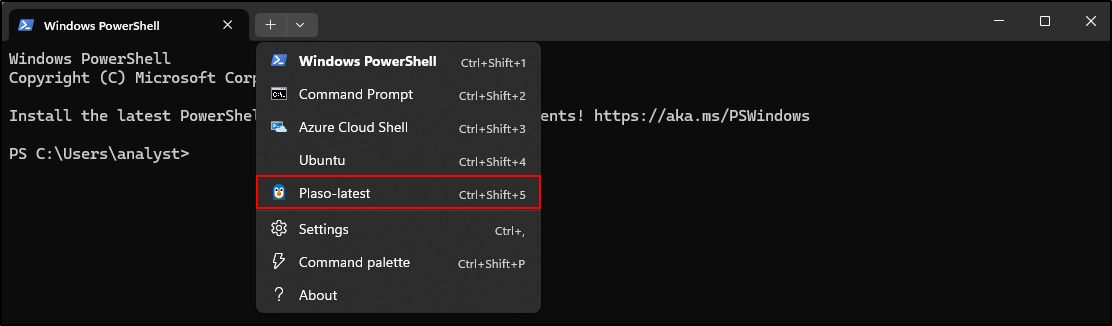
Figure 3. Locate the Plaso distribution in Windows Terminal.
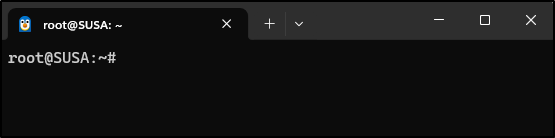
Figure 4. Open the imported Plaso environment.
Using the SMB share on the Linux VM
Transfer is a setup helper. Use your approved authenticated file-transfer method first. If using SMB, connect with a named account to a share configured to support signing. Linux SMB servers can support signed connections; the original guest-share example below describes this lab's configuration, not a limitation of all Linux servers. You can also copy the tar archive using your existing authenticated VM file-transfer workflow.
Before changing the disposable Windows VM, save its current settings in an Administrator PowerShell window:
$plasoSmbKey = 'HKLM:\SYSTEM\CurrentControlSet\Services\LanmanWorkstation\Parameters'
$plasoSmbBefore = @{
    Client = Get-SmbClientConfiguration | Select-Object EnableInsecureGuestLogons, RequireSecuritySignature
    GuestValuePresent = (Get-Item -LiteralPath $plasoSmbKey).GetValueNames() -contains 'AllowInsecureGuestAuth'
    GuestValue = Get-ItemPropertyValue -LiteralPath $plasoSmbKey -Name AllowInsecureGuestAuth -ErrorAction SilentlyContinue
}
$plasoSmbBefore | Export-Clixml -LiteralPath "$env:TEMP\plaso-smb-before.xml"
The following procedure describes the guest-share configuration in the screenshots. Prefer authenticated transfer; enabling guest access and disabling required signing removes protections. Keep the VM isolated if you deliberately reproduce it.
The Linux SIFT Workstation has been configured to share its /cases and /mnt directories via SMB. You can verify this SMB config by running the following command:
root@siftworkstation:/cases# cat /etc/samba/smb.conf
[global]
workgroup = SANS
server string = SIFT WORKSTATION
netbios name = SIFTWORKSTATION
security = USER
map to guest = Bad User
dns proxy = no
include = /etc/samba/smb-%L.conf
guest account = sansforensics

[cases]
path = /cases
browseable = yes
writeable = yes
guest ok = yes
inherit owner = yes
create mask = 744
inherit permissions = yes

[mnt]
path = /mnt
browseable = yes
read only = yes
guest ok = yes
Check if Samba service is running:
root@siftworkstation:/cases# systemctl status smbd
● smbd.service - Samba SMB Daemon
     Loaded: loaded (/lib/systemd/system/smbd.service; enabled; vendor preset: enabled)
     Active: active (running) since Tue 2026-04-07 20:41:56 UTC; 27min ago
       Docs: man:smbd(8)
             man:samba(7)
             man:smb.conf(5)
   Main PID: 1259 (smbd)
     Status: "smbd: ready to serve connections..."
      Tasks: 4 (limit: 4432)
     Memory: 15.0M
        CPU: 349ms
     CGroup: /system.slice/smbd.service
             ├─1259 /usr/sbin/smbd --foreground --no-process-group
             ├─1269 /usr/sbin/smbd --foreground --no-process-group
             ├─1270 /usr/sbin/smbd --foreground --no-process-group
             └─1276 /usr/lib/x86_64-linux-gnu/samba/samba-bgqd --ready-signal-fd=47 --parent-watch-fd=12 --debuglevel=0 -F

Apr 07 20:41:54 siftworkstation systemd[1]: Starting Samba SMB Daemon...
Apr 07 20:41:55 siftworkstation smbd[1259]: [2026/04/07 20:41:55.561519,  0] ../../source3/smbd/server.c:1734(main)
Apr 07 20:41:55 siftworkstation smbd[1259]:   smbd version 4.15.13-Ubuntu started.
Apr 07 20:41:55 siftworkstation smbd[1259]:   Copyright Andrew Tridgell and the Samba Team 1992-2021
Apr 07 20:41:56 siftworkstation systemd[1]: Started Samba SMB Daemon.
Newer versions of Windows do not allow accessing anonymous SMB shares by default. Also, Windows 11 24H2 Enterprise added an SMB signing requirement for both inbound and outbound connections, which breaks outbound connections to a Linux SMB server. Open a PowerShell command prompt as Administrator and run the following commands:
Set-ItemProperty -Path "HKLM:\SYSTEM\CurrentControlSet\Services\LanmanWorkstation\Parameters" AllowInsecureGuestAuth -Type DWORD -Value 1 -Force
Set-SmbClientConfiguration -RequireSecuritySignature $false -Force
We can either use the hostname siftworkstation or the IP address of the Linux SIFT to connect to the share directly:
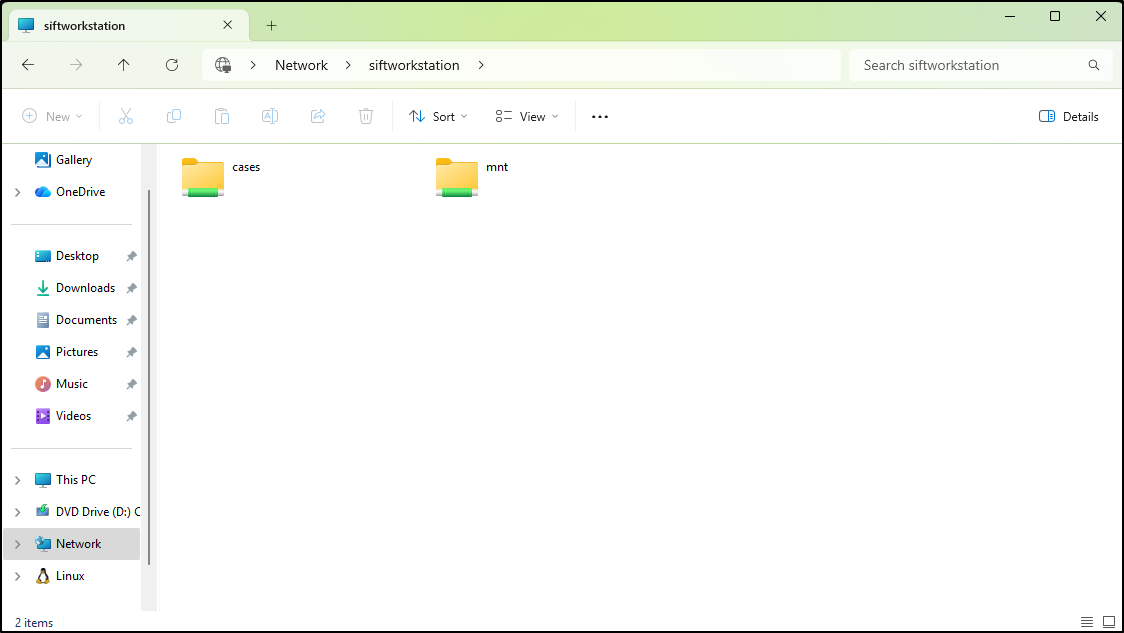
Figure 5. Access the original SIFT lab share; authenticated transfer is the preferred route.
Restore after transfer: in Administrator PowerShell on the same VM, import the settings you saved before the change. Keep the record with your lab notes until restoration is confirmed.
$plasoSmbBefore = Import-Clixml -LiteralPath "$env:TEMP\plaso-smb-before.xml"
Set-SmbClientConfiguration -EnableInsecureGuestLogons $plasoSmbBefore.Client.EnableInsecureGuestLogons -RequireSecuritySignature $plasoSmbBefore.Client.RequireSecuritySignature -Force
$plasoSmbKey = 'HKLM:\SYSTEM\CurrentControlSet\Services\LanmanWorkstation\Parameters'
if ($plasoSmbBefore.GuestValuePresent) {
    Set-ItemProperty -LiteralPath $plasoSmbKey -Name AllowInsecureGuestAuth -Value $plasoSmbBefore.GuestValue -Type DWORD
} else {
    Remove-ItemProperty -LiteralPath $plasoSmbKey -Name AllowInsecureGuestAuth -ErrorAction SilentlyContinue
}
Get-SmbClientConfiguration | Select-Object EnableInsecureGuestLogons, RequireSecuritySignature
If the file is missing, stop and recover the recorded baseline or restore the disposable VM snapshot. Do not guess its prior settings. Confirm the registry value or its absence and both client settings match the saved baseline; managed policy may also control them.
Verify the Plaso WSL distro
From Windows Terminal, open Plaso-latest as shown above. In its Linux shell, record the installed versions:
Look for: all three commands are available in the same distro. Record the versions and image digest with your notes; they can differ from the screenshots. Then continue with your checked body file and the same host's collected artefacts. The Interactive Lab supplies a simulated Plaso WSL terminal to practise the processing commands without an installation.